Now that you are connected to Bullhorn, let’s import some jobs.
What Gets Imported
Before we can import jobs, let’s understand what is imported into Matador from Bullhorn. It is possible your company uses Bullhorn differently, so knowing how Matador works by default is important.
The following default import conditions are applied to all job import variations, except when explicitly overridden by a developer filter. Jobs will be imported where:
isOpen=true: Jobs must be marked as open. Closed jobs are not imported.
isDeleted=false: Jobs “soft” deleted will not be imported. Bullhorn typically doesn’t fully delete certain types of data in your database, including jobs, and instead hides them from view and from reports by marking them as “deleted.” This is considered a “soft” delete and will result in the job not being imported.status<>'Archive': This condition reads, “do not import jobs with the status of archive.” Bullhorn allows users to archive a job posting, often when the role is no longer being promoted. Since a job that is open can be archived, a way to remove any unfilled vacancies from your marketing is to archive them.
- and finally, the result of the “Published Status” option, which defaults to “Published (Submitted)”. Please read the next section for more on that.
If a job meets all of the above requirements, it will be qualified to import into Matador Jobs.
Job Publishing and Job Status
In Bullhorn, a job listing can (and should) be published.
Publishing is a deliberate action on the part of the agency staff when they know their job ad is ready for consumption by the public and via tools like Matador Jobs. It is important you understand publishing in Bullhorn as well as the associated Matador Jobs settings to ensure your jobs get imported to your website.
The Best Practice: Publish Job Ads
Technically, Matador Jobs, as we will explain in a moment, can import jobs without them being published if you select an option in a setting. That said, should you really use it?
We vote: NO.
Matador Jobs is not the only Bullhorn Marketplace Partner solution you may one day use, and other Bullhorn Marketplace Partner solutions as well as core Bullhorn products, add-on or otherwise, may not allow you to use unpublished jobs in their workflow and they expect you to follow the publishing workflow.
The Difference Between Published – Submitted and Published – Approved
Adding a layer of complexity to this is, depending on the size of your company, your Bullhorn account may be configured to require a two-step publishing process. In this two-step publishing process, a job listing is prepared by a recruiter or their assistant and “published”, but the publishing is incomplete until it is reviewed by a senior person at the agency.
Matador Jobs allows you to use either level of publishing for importing to your job site, but as a best practice, if your company uses the two-step publishing process that requires approval required for publishing, you should either use the two-step process or contact Bullhorn support to remove it if you do not plan to use it.
How to Publish Jobs in Bullhorn
Publishing Jobs in Bullhorn is easy.
- Enter the job detail screen by clicking on any Job.
- After updating any fields you may want to update, including job title, address, and description, save the job.
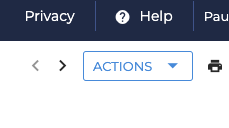
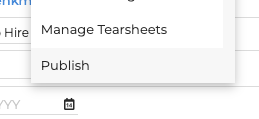
- In the top-right click on the Actions button to bring up the Job Actions menu.
- At the bottom of the menu, click Publish to enter the publishing screen.
- In the publishing screen, you will have an option to update/revise the key parts of the job listing. The description on this screen will begin as a copy of the original job description but will diverge from this point forward with any changes made. You should also select the single Published Category and Published Contact Recruiter.
- Click Publish or Republish, if the job was previously published, in the bottom right.

- If your publishing actions require a approval, a person qualified to approve will be notified and should complete the process.
Repeat the above for each job you want to be published to you Matador Jobs powered website.
The “Published Status to Import” Setting
Once you’ve published a few jobs, you can now return to your WordPress website with Matador Jobs and import your first jobs. Before you do, however, let’s review the “Published Status to Import” setting.
Go to the WordPress Admin, then the Matador Jobs sidebar menu, then select Settings. In the settings, select the Job Listings tab. The “Published Status to Import” is the second setting on the page.
This setting determines which published status condition to add to the default import conditions listed earlier. The options are:
- All Jobs. This option includes a warning (“Careful”) as it will import all published or unpublished jobs that otherwise are not deleted, not the status of archived, and open. Sometimes, selecting this option can result in thousands of jobs being imported going back years.
- Published – Submitted. This option will import jobs where the publishing status is submitted OR approved. This is useful for companies that may have publishing approval processes set up but want jobs on the website as soon as recruiters submit them for publishing.
- Published – Approved. This option will import jobs where the publishing status is approved only. This is the recommended setting, especially the agency has the two step publishing in place.
Your First Import
Okay, you understand what is imported, you have learned all about publishing and you’ve published jobs in Bullhorn, and you’ve fine-tuned your import settings, it is time to trigger a sync.
Go to WordPress Admin > Matador Jobs > Settings. Click on the Button that says Sync. In a few minutes, Matador Jobs will download jobs matching the import conditions into your site.
Troubleshooting
If your sync does not work, there are a few possibilities:
- Your connection to Bullhorn is not stable. Review the Connecting to Bullhorn document and make sure things are set up right.
- You may be modifying the import with a Matador Jobs Pro All Access Extension and/or custom code that is faulty. Try removing those extensions and/or disabling custom code and running Hard Sync to see if sync runs properly.
- Check your log files. Common issues that block sync are logged in the Matador Jobs log files and may help you resolve the issue.
- Your website is throwing some form of PHP critical error that may be suppressed on the front-end. Check the Matador Jobs log files and the server log files for any issues, or enable
WP_debugand see if any errors are printed to screen.
If your sync runs but jobs or job data you think you should’ve imported is missing:
- Your jobs are not properly published, or the “Published Status to Import” setting is not aligned with your company’s workflow.
- Check the other settings in Matador Jobs > Settings > Job Listings to see if you are importing the wrong data point. For example, Bullhorn has Categories or Published Category for job category, and Matador lets you select which you’d like to use.
- Check your Bullhorn instance isn’t using non-standard fields for standard items. For all job fields, Matador Jobs assumes you are using Bullhorn as intended. It is common for us to aid users in issues related to things like addresses or categories because someone, a long time ago, set up
customText1as the job category instead of using the defaultcategoriesfield. Review this in your Bullhorn Field Mappings tool. - Addresses are imported as either the address on the Job Order, or if the job has no address, will be imported as the address for the hiring company. If your imports have jobs at the wrong location, ensure the job orders have the correct address. Learn more about these special situations in the More About Bullhorn Sync help doc.
- Some Matador Jobs data points expect the users to enable standard, but often hidden fields and or pass expected data. An example is Remote/Work from Home flags which read from the Bullhorn
onSitefield and expect certain values. Learn more about these special situations in the More About Bullhorn Sync help doc.
If you continue needing help, you may file a support ticket.
What’s Next
Now that we have jobs imported into our WordPress website’s database, let’s show them off by making our first Matador Jobs jobs search page.