This guide will walk you through setting up the Matador Jobs Recruiter Profiles extension, the available settings, and how the blocks and shortcodes it provides are intended to be used.
Configure your settings
The first step in setting up the extension is configuring the settings: it’s crucial that you do this first for the extension to function properly.
There are several settings for you to set things up just the way you need them.
Linked Recruiter Types
Use this setting to determine which recruiter types in Bullhorn will be associated with your jobs. There are 3 types of association you can use to link recruiters to jobs, each of which maps to a specific field in Bullhorn:
- Job Owner (owner)
- Assigned User(s) (assignedUsers)
- Published Contact Recruiter (responseUser)
These fields are imported for each job by default by Matador Jobs.

Default Detail Toggles
You can set which fields will appear by default using the toggles on the settings page. These toggles will cause the extension’s blocks and shortcodes to include this field when displaying recruiters. It is possible to override these defaults, using either the toggles in block settings, or the fields argument passed to a shortcode.

Image Size Default
You’ll notice that when the Profile Photo toggle is on, a Profile Photo Size dropdown list appears too. Use this to select the default size for the Profile Photo. This list is populated with the image sizes on your WordPress site. For more information on WordPress image sizes see here.

Once you have the settings just the way you want them, it’s time to move on to setting up some recruiters.
How does the extension make a link between Recruiters and Jobs?
Similarly, one of the default (and required) fields for recruiters is their email address, this email address is stored in the post meta of recruiter
So, at this stage we have a job with one or more recruiters email addresses stored in its metadata, and we have one or more recruiters with their email addresses stored in their metadata. To link a recruiter to a job, the extension looks for recruiters with an email address that matches the email address of the designated recruiter(s) it has stored in its metadata. This means that it’s essential for the email address assigned to the job in Bullhorn to match those filled in when creating the recruiters.
Create a new recruiter
To create a new recruiter go to the Admin Dashboard of your WordPress site, navigate to the Matador Jobs item in the sidebar menu and select ‘Recruiter Profiles’. At the top of the page you will see an ‘Add New’ button, click on this button. This will open up a post editor where you can fill in the recruiter’s details. To edit the profile photo, you will need to use the ‘Profile Image’ section in the sidebar.


Once you’ve filled in the details you’d like to fill in, you can save this post like you would any other on your WordPress site, either as a draft or by publishing it using the button on the top-right of the page
Displaying recruiter details on your site
Now that you’ve set up the settings and created your recruiters, it’s time to display your recruiters’ details on your site. There are 3 ways to do this:
Option 1: Blocks
Choose this option if you’re using WordPress’ full site editing (FSE) features. At the time of writing, this is the most up-to-date way of managing the frontend of your WordPress site, and probably the simplest way to implement recruiter profiles.
Matador Jobs’ Recruiter Profiles extension adds two new blocks to your site: Recruiter Profile, and All Recruiters.
The Recruiter Profile block can be used either to display a specific recruiter or to display the recruiter(s) linked to a job.
The All Recruiters block can be used to display the details of all the recruiters on the site.
Both blocks have a set of block controls which enable customisations:
- Choose a Specific Recruiter: This toggle enables you to switch between 2 modes for the block, specifying a recruiter to display (this recruiter will be displayed no matter the context), or inheriting this recruiter from context (e.g. in the context of a job post, the block will display the linked recruiter(s).
- Recruiters: If you toggle ‘Choose a Specific Recruiter’ to On, you will be presented with a dropdown list of recruiters to choose from. Whichever recruiter you select will be the one displayed by the block.

- Fields to Display: These toggles can be used to override the default display fields. A field set to off by default, can be made to appear for this specific block by toggling it on.
Option 2: Shortcodes
Choose this option if you’re using a page-builder plugin like Elementor or Divi. Matador Jobs’ Recruiter Profiles provides two shortcodes: [matador_linked_recruiters] and [matador_all_recruiters]. Use the [matador_linked_recruiters] shortcode to display the recruiter(s) linked to a job. Use the [matador_all_recruiters] shortcode to display details of all the recruiters on the site.
It is possible to override the default recruiter fields for both shortcodes by passing a “fields” argument to the shortcode with the desired display fields specified (see example below)

Option 3: Template Functions
Choose this option if you’re a developer writing php templates. Matador Jobs’ Recruiter Profiles extension provides two template functions. These template functions simple echo out the shortcodes (see source code below)
Use the matador_linked_recruiters() to display recruiters linked to a specific job, or on a recruiter single page. Use the matador_all_recruiters() function to display all the recruiters on the site.
/**
 * Echoes the linked-recruiters shortcode.
 *
 * @since 1.0.0
 *
 * @param string $fields Optional. A string of fields to be passed to the shortcode. Default empty string.
 * @return void
 */
function matador_linked_recruiters( $fields = "" ) {
    echo do_shortcode("[matador-linked-recruiters fields=$fields]");
}

/**
 * Echoes the all-recruiters shortcode.
 *
 * @since 1.0.0
 *
 * @param string $fields Optional. A string of fields to be passed to the shortcode. Default empty string.
 * @return void
 */
function matador_all_recruiters( $fields = "" ) {
    echo do_shortcode("[matador-all-recruiters fields=$fields]");
}
What’s next ?
Now that you’ve got everything set up, it’s time to display your recruiters on your website! Exactly how you do this is up to you, but if you’re stuck for ideas have a look at the suggestion below
Use Cases
Recruiter Profile on Job Single
A very common request from our clients is to be able to display the details of the recruiter responsible for a specific job alongside all the other details concerning that job (it’s the frequency with which we received this request that made us think making this whole extension was a good idea!). Here are some screenshots of this use case to give you some inspiration:

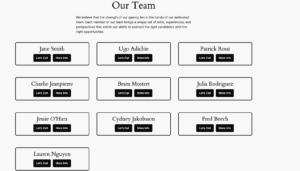
Our Team Section/Page (Display all recruiters)
Another use for this extension would be showcasing your whole recruitment team. By adding each team member as a recruiter you can display them alongside their details conveniently as in the example below.
Recruiter Profile Page
Finally, you may want to create pages telling candidates a little more about each recruiter, this can be achieved quite easily by creating a recruiter specific single post template.