Welcome to the setup guide for the Asana Integration Add-On for Matador Jobs Pro. This powerful extension enhances your recruitment workflow by seamlessly connecting Matador Jobs Pro with Asana. When candidates apply to jobs, a corresponding task is automatically created in Asana, ensuring your team can efficiently track and manage candidate progress within your preferred project management tool.
In this guide, we’ll walk you through the steps to install, set up, and configure the extension, so you can start leveraging the benefits of streamlined task management in Asana right away.
Downloading & Installing
To start using the Asana Integration Extension for Matador Jobs Pro, you first need to download and install the plugin on your WordPress site. Begin by logging into your account at Matador Jobs and downloading a ZIP file of the add-on.
Next, log into your WordPress admin dashboard and go to the “Plugins” section. Click “Add New” and then “Upload Plugin” at the top of the page. Choose the ZIP file you downloaded and click “Install Now.” Once the installation is complete, click “Activate Plugin” to enable the Asana Integration Extension. Next, navigate to Matador Jobs >> Settings and ensure you can see a tab labelled ‘Asana’.
Get a Personal Access Token
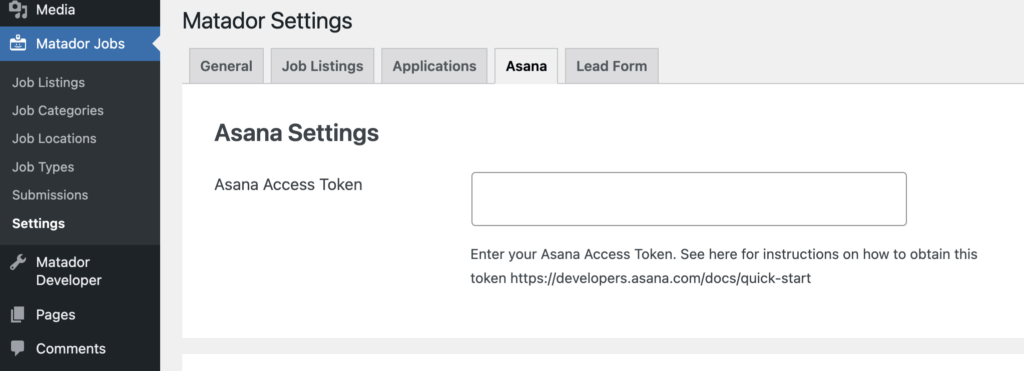
To integrate Asana with Matador Jobs Pro, you’ll need to generate a personal access token from Asana: you can see their instructions on how to do this here.
Once you have the personal access token copy and paste it into the ‘Asana Access Token’ field in the add-ons settings, and save the settings.
Application Settings
You can control whether or not applications on your site cause tasks to be created on your site using the ‘Create Application Tasks’ toggle.
You can also decide when tasks should be created in Asana using the ‘Create Asana Tasks When’ setting. When set to ‘Upon Application’, tasks will be created in Asana as soon as the application form is submitted. When set to ‘Upon Successful Sync’, tasks will be created when an application is successfully synced to Bullhorn – an advantage of using the ‘Upon Successful Sync’ setting is that information from Bullhorn (e.g. a candidate’s Bullhorn ID) can be included in the task’s details.
Set a Workspace and Project
Setting the Asana Personal Access token and saving the page should have caused your workspaces and projects to be loaded into the ‘Asana Workspace’ and ‘Asana Project’ dropdown lists. Select the workspace and project you want application tasks to be created in. You may need to save your workspace selection and refresh the page to populate the list of projects
Resume Attachments
Application tasks can include the applicants resume as a file attachment. Toggle this on/off using the ‘Attach Resume’ setting.

Custom Fields
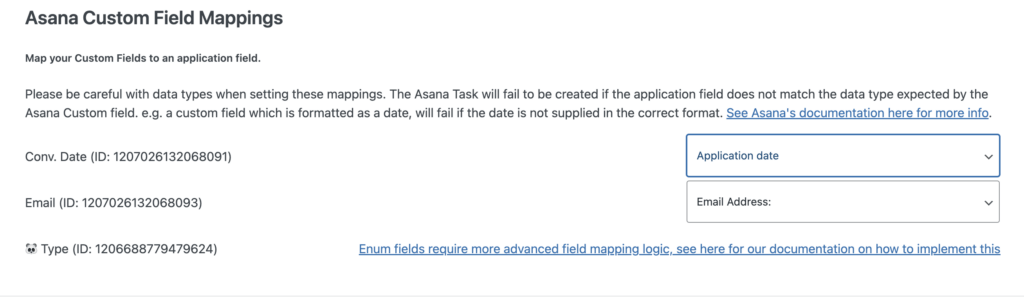
Some of our clients have custom fields set up in their Asana projects, and wish to map form data onto those custom fields. We have provided an interface so that simple correspondances between form data and a destination custom field can be set up from the settings. However, more complex custom fields (e.g. enum type custom fields) will require some custom code to function properly. See an example here.
When setting up these mappings, it’s very important to pay attention to the types of data your Asana custom field can accept – if incorrectly formatted data does make it into the task creation request, then the task will not be created in Asana.
Lead Form Settings
When the Client Lead Form for Bullhorn Add-On is also installed and activated on your site, the Asana Integration Add-On can also be used to create tasks when the lead form is submitted. You will see the settings for the lead form below those for the application tasks.